请先允许我发句牢骚:TMD,这个破作者,前后跳节跳的特别厉害。blueViewController都没画在storyboard里就开始写上一堆代码。。。然后到本章快结束的时候才说了这些。于是这一章我翻过来再翻过去,看了4~5遍,才明白,上午半天就这么浪费了
遇到的问题
1、Toolbar 书里面只写了用底部约束即可,但是在IOS6以上的模拟器,toobar的宽度 就不够了,必须得加上左边距约束与右边距约束才OK
2、blueViewController和yellowViewController一样,要加上4条边的约束,不然在IOS6模拟器上,全部吊在左上角。
3、if (!self.yellowViewController.view.superview )。。。这样的写法在swift中不行必须是
if self.yellowViewController?.view?.superview == nil ,注意那两个问号,刚开始为了这直接APP崩了两三次,报错是:
XML/HTML代码
- fatal error : unexpectedly found nil while unwrapping and Optional value
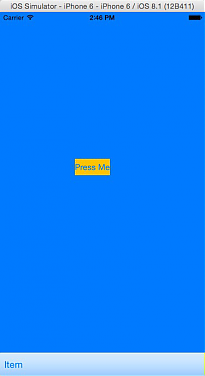
所幸,全解决了,最后附上 今天成功的图片,可能对别人来说只是几分钟的事情,但我还是有成就感
下一步,第七章开始
其实这些东西都是根据网上的资料来解决的。
那些下载字符串,在去除协议后,都是采用BASE64加密过,所以,先解密一下,再处理,就很方便了。
其中,迅雷是在解密后的字符串两头加了“AA”和“ZZ”两个字符串
flashget则是加了[FLASHGET]标签
QQ则最简单,啥也没加,解密后就能用。
flashget在处理前,需要先把&以后的字符串全部清空再作Base64的解密转换。
不多说,源码如下:
PHP代码
- function decode ( $string )
- {
- $exp = explode( "://", $string );
- $type = strToLower( $exp[0] );
- if ( $type == 'thunder' ){
- return str_replace(array("AA","ZZ"),"",base64_decode( $exp[1] ));
- }else if ( $type == 'flashget' ){
- $exp[1] = subStr( $exp[1], 0 , strPos( $exp[1], '&' ) );
- return str_ireplace("[flashget]","",base64_decode( $exp[1] ));
- }else if ( $type == 'qqdl' ){
- return base64_decode( $exp[1] );
- }
- }
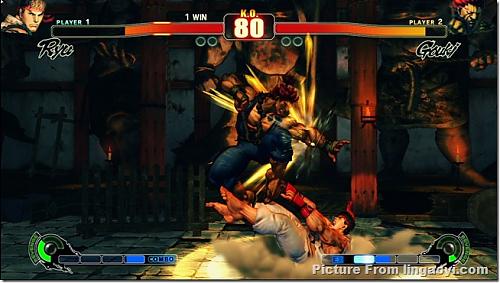
由CAPCOM负责开发的格斗游戏《街头霸王4》(Street Fighter 4)最新试玩截图公布,本作将承袭系列作传统2D玩法,并采用最新的3D绘图技术,以更华丽的方式重现原作独特的2D绘图风格。PC版发售日期未 定,XBOX360/PS3即将2月17日发售。
另外,CAPCOM透露将推出内含限量非卖版人偶模型(PS3 版为隆,Xbox 360 版为深红毒蛇)、Studio 4C 制作之65分钟高分辨率动画影片(PS3版为BD蓝光影片,Xbox 360 版为专用高分辨率DVD影片,非一般 DVD 影片)、原声配乐 CD、攻略指引手册与独家下载内容的典藏版,定价 79.99美元。
以上内容来自于:http://www.lingaoyi.com/screens/new-street-fighter-4-screenshots/,同时以下图片也来自于该站(我只取了两张与我有关的图片)
更多图片请去该网站查看。。。

没想到啊,连微软也加入了openId的行列了。
看来openId对现在的网络的影响太大了,只是它由谁来管理呢?做为一个商业网站,是没有人会愿意使用OPENID的,但是对于社交化网络,OPENID就显得有点必要了,毕竟没有谁会愿意到处注册userid这类的,谁知道几年后还记不记得自己所设的密码?我的密码找回问题又是什么?
Windows Live ID Commits to Support OpenID
Beginning today, Windows Live ID is publicly committing to support the OpenID digital identity framework with the announcement of the public availability of a Community Technology Preview (CTP) of the Windows Live ID OpenID Provider.
You will soon be able to use your Windows Live ID account to sign in to any OpenID Web site!
The Windows Live ID OpenID Provider (OP) enables anyone with a Windows Live ID account to set up an OpenID alias and to use that alias for identification at an increasing number of OpenID 2.0 relying party sites-for example: Plaxo, Pibb, StackOverflow.com and Wikispaces.
What is OpenID?
The official answer from the OpenID Foundation (the guardians of the OpenID specs) is that "OpenID is a free and easy way to use a single digital identity across the Internet." (Source: http://openid.net/)
OpenID is an emerging, de facto standard Web protocol for user authentication. It helps eliminate the need for multiple user names across different Web sites, thereby simplifying a user's online experience. Stated another way, you can reuse your OpenID account at different Web sites without having to create a new user name and password at each site you use.
More information about OpenID is available at http://openid.net.
Windows Live ID OpenID Provider - October 2008 (CTP)
The initial release is a Community Technology Preview (CTP) Release in the Windows Live ID Integration (INT) environment. It is intended primarily for relying-party Web sites and developers of relying-party client libraries, to enable them to test the interoperability of their implementations against the Windows Live ID OP endpoint and flush out any bugs or incompatibilities.
Note that the Windows Live ID OP supports only the OpenID 2.0 protocol.
The Windows Live ID INT environment is separate from the main Production environment, and is for testing purposes only. If you have not already created a Windows Live ID user account for testing in INT, you can do so at http://login.live-int.com/.
After you have your Windows Live ID account in INT, go to https://login.live-int.com/beta/ManageOpenID.srf to set up your OpenID alias on that test account.
NOTE: INT accounts are for testing purposes only and are NOT intended to be permanent user accounts. They do not allow access to Windows Live services in Production.
Windows Live ID OpenID Provider - Future Release Plans
The current Technology Preview release is for testing purposes only, and is not intended for widespread adoption at this stage. After a period of industry testing and feedback, we will be incorporating any necessary fixes and feature enhancements into the next revision, to be released to Production sometime in 2009.
We do NOT recommend that anyone use their INT alias as their permanent OpenID account at this time; users should wait until the final release of the OP to Production.
Open Standards Support
All Windows Live product teams are committed to supporting open standards where such standards are relevant to our work and when they reach a sufficient level of maturity, and the Windows Live ID Team is no exception. We have been tracking the evolution of the OpenID specification, from its birth as just a dream and a vision through its development into a mature, de facto standard with terms that make it viable for us to implement it now.
We look forward to making it easier for our users to access the Web sites they use, by reducing their need to create additional identity accounts. That is the promise of OpenID. We are happy to support that goal by providing OpenID-based sign-in functionality to Windows Live ID account holders.
Try It Now. Tell Us What You Think
We want you to try the Windows Live ID OpenID Provider CTP release, let us know your feedback, and tell us about any problems you find.
To prepare:
- Go to http://login.live-int.com/ and use the Sign up for an account link to set up a Windows Live ID test account in the INT environment.
- Go to https://login.live-int.com/beta/ManageOpenID.srf to set up your OpenID test alias.
Then:
- Users - At any Web site that supports OpenID 2.0, type openid.live-INT.com in the OpenID login box to sign in to that site by means of your Windows Live ID OpenID alias.
- Library developers - Test your libraries against the Windows Live ID OP endpoint and let us know of any problems you find.
- Web site owners - Test signing in to your site by using a Windows Live ID OpenID alias and let us know of any problems you find.
You can send us feedback at:
For more information, see the Windows Live ID blog: http://winliveid.spaces.live.com/Blog/cns!AEE1BB0D86E23AAC!1745.entry
Jorgen Thelin
偶在网上闲逛。突然发现一段内容,对应家中现有的有线电视情况,突然感到好紧张。。。贴上部分内容,陪我一起震惊吧。
原文:http://www.dbanotes.net/mylife/fuck_huashu_tv.html
- 自从用了这个遥控器,我就感觉不对劲儿,怎么赛事正精彩的时侯屏幕上会出来个小窗口提示有奖答题呢? 第一次看到以为是央视搞的,后来频繁的出现感觉有点不对,按遥控器的"退出"键,居然提示,"确定退出么?" 按"确定",居然也要半天才能消失这个小浮动窗口。真是有些震惊啊,这下真的互动了,弹窗广告居然搞到电视上来了!
-
- 流氓会武术,谁都挡不住! 相信这个技术会被更多有线电视运营商采用的。到时候面对时不时的弹窗广告,加上原来就有的贴片广告,以及那些"精彩绝伦"的电视购物广告,这电视还能看下去么? 奥运过后,电视关闭!
好佩服现在的厂商呀。这是否和当年的分众一个想法?只是这个想法比分众还疯狂啊。估计是和电信学的吧?


