Submitted by gouki on 2015, October 20, 10:08 AM
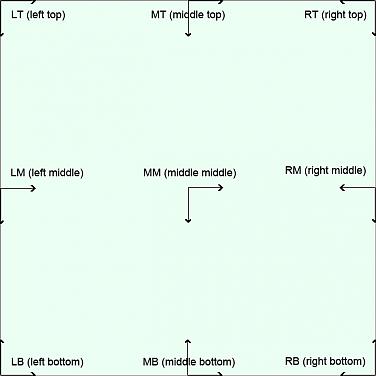
position有9个点:lt,mt,rt,lm,mm,rm,lb,mb,rb,其实对应的是几个英文:lt(left top),mt(middle top),rt(right top),以此类推
上官方原图:
OK,然后我们看一下他的代码是怎么写的,如果有人涉及到也可以借鉴:
PHP代码
- <?php
-
-
-
-
-
-
-
-
-
-
-
-
-
-
-
- public static function calculatePositions($containerWidth, $containerHeight, $layerWidth, $layerHeight, $layerPositionX, $layerPositionY, $position = 'LT')
- {
- $position = strtolower($position);
-
- if ($position == 'rt') {
-
- $layerPositionX = $containerWidth - $layerWidth - $layerPositionX;
-
- } elseif ($position == 'lb') {
-
- $layerPositionY = $containerHeight - $layerHeight - $layerPositionY;
-
- } elseif ($position == 'rb') {
-
- $layerPositionX = $containerWidth - $layerWidth - $layerPositionX;
- $layerPositionY = $containerHeight - $layerHeight - $layerPositionY;
-
- } elseif ($position == 'mm') {
-
- $layerPositionX = (($containerWidth - $layerWidth) / 2) + $layerPositionX;
- $layerPositionY = (($containerHeight - $layerHeight) / 2) + $layerPositionY;
-
- } elseif ($position == 'mt') {
-
- $layerPositionX = (($containerWidth - $layerWidth) / 2) + $layerPositionX;
-
- } elseif ($position == 'mb') {
-
- $layerPositionX = (($containerWidth - $layerWidth) / 2) + $layerPositionX;
- $layerPositionY = $containerHeight - $layerHeight - $layerPositionY;
-
- } elseif ($position == 'lm') {
-
- $layerPositionY = (($containerHeight - $layerHeight) / 2) + $layerPositionY;
-
- } elseif ($position == 'rm') {
-
- $layerPositionX = $containerWidth - $layerWidth - $layerPositionX;
- $layerPositionY = (($containerHeight - $layerHeight) / 2) + $layerPositionY;
- }
-
- return array(
- 'x' => $layerPositionX,
- 'y' => $layerPositionY,
- );
- }
END;
Tags: imageworkshop, position
PHP | 评论:1
| 阅读:29934
Submitted by gouki on 2015, October 10, 5:01 PM
之前有发过一篇博客:几个常见的 Composer 国内镜像 ,经过长期的测试,发现这些源不是少内容就是速度慢,这不再推荐一个新的,用了它之后,我就腰不酸腿不疼了:http://packagist.phpcomposer.com 【其实这个就是原来的:http://pkg.phpcomposer.com/repo/packagist/,只是换个名字,但这个好象确实快了一点】
具体的操作方法查看上文的博客内容。
苹果相关 | 评论:0
| 阅读:22957
Submitted by gouki on 2015, October 9, 5:47 PM
这是一个备份,起因是由于我现在使用的gogs不能使用ssh的方式连接,主要是不方便,所以目前我是使用了HTTP的方式。
看了这篇文章后对我有启发,但是我没有使用,所以只是先做个备份。原文在:http://www.luxingmin.com/archives/278.html
XML/HTML代码
- 一直想实现指定git访问的私钥,网上资料给出来的都是通过ssh_config来实现,这种方法很繁琐,另外想实现git webhook部署时,使用这种方法也比较不灵活。
-
- 切入正题
-
- 建立git_ssh文件,内容如下
-
- #!/bin/bash
- ssh -i $SSH_KEY_FILE $1 $2
- 然后增加执行权限
-
- chmod 755 git_ssh
- 然后就可以通过如下命令指定git访问时使用的ssh私钥
-
- SSH_KEY_FILE=/root/git/id_rsa GIT_SSH=/root/git/git_ssh git clone git@xxx
---EOF---
Tags: ssh, git, gogs
苹果相关 | 评论:0
| 阅读:24763
Submitted by gouki on 2015, October 9, 10:42 AM
正如标题所说的:QQ For Mac 4.0.4在OSX EI有问题,请别急着安装。
4.0.4是修复了聊天窗口的阴影问题,但他带来了更严重的问题,只要有收到消息,不管QQ当前运行在前台还是在状态栏,都会使得程序失去焦点。包括QQ自己也会这样。
因此你会遇到,在QQ里打字,刚打两下,突然,光标没了。需要鼠标点击一下当前窗口,才能继续 下去,如果你的群组过多,建议别升了,否则你永远处于1~2秒后就失去焦点。在任何程序 里都是。。
再忍忍吧。等4.0.5吧,为什么QA没测试出这个问题?
4.0.3的传送门:http://dldir1.qq.com/qqfile/QQforMac/QQ_V4.0.3.dmg
或者,如果你对3.1.2还有兴趣的话:http://dldir1.qq.com/qqfile/QQforMac/QQ_V3.1.2.dmg
Flutter | 评论:0
| 阅读:22143
Submitted by gouki on 2015, October 8, 5:10 PM
转一篇Vargrant的相关文章【Vagrant下共享目录静态文件(js/jpg/png等)“缓存”问题】,原文来自:http://blog.smdcn.net/article/1325.html,主要是问题在于使用了sendfile可能会导致部会内容不会刷新。
原文如下:
XML/HTML代码
- 之前提到说通过Vagrant部署开发环境,使用目录共享模式,在本地磁盘进行开发,而通过虚拟机环境运行开发的页面。
-
- 是的,一切看起来都是那么的顺利,首先基于VirtualBox安装了Vagrant,接下来,按照以往部署环境的习惯,在VM中安装了nginx作为开发运行环境,并且将本地的共享目录作为nginx的web目录,然后打开页面,看上去似乎都很正常,但接下来,你发现了一个神奇的事情,你修改替换了一个css,一张图片,然后刷新浏览器,发现什么都没有变,然后你有非常猛烈、使劲的F5,依旧还是没有改变,是的,你看看编辑器,似乎替换是正常的,在看看VM上的文件,也都是对的,是的,尝试重启nginx,依旧没有任何变化,你开始怀疑php5-fpm甚至于毫不相干的memcached和mysql,但都无济于事。也不知道是什么让这些文件被“缓存”了呢。
-
- 当你尝试修改一个js,并且用同样的方法更新之后,会遇到类似的问题,是的,就算重启VM上任何服务,甚至重启VM,依旧没有用,当然,比起其他资源文件,浏览器的反应会强烈一些,因为浏览器会提示未知错误,而你通过浏览器查看你修改的JS文件,会看到文件尾巴有下面奇怪的随机字符:
-
- �����������������
-
- 这到底是什么东西呢?编码错误?缓存异常?又或是其他什么?
-
- 是的,你尝试花费很多时间,试验各种各样的方法去解决这个问题,其实对于nginx来说,你只需要修改配置文件(nginx.conf)中的一行重启就能简单的解决这个问题:
-
- sendfile off;
- 找到 nginx.conf ,把里面的 “sendfile on” 修改为 “sendfile off”。
-
- 当然,如果你使用Apache也可能遇到类似的问题,那么同样也有类似的配置需要修改:
-
- EnableSendfile off
- 关于这个问题的参照:
- https://github.com/mitchellh/vagrant/issues/351#issuecomment-1339640
-
- http://stackoverflow.com/questions/9479117/vagrant-virtualbox-apache2-strange-cache-behaviour
----转载完毕---
关于这个sendfile,还有人做了个测试:记vagrant nginx sendfile问题,然后居然没有人评论。。。
XML/HTML代码
- 从今年开始,一直在vagrant虚拟机上做开发
-
- 因前段时间一个项目需要调试静态文件,出现静态文件修改后,浏览器刷新不生效。
-
- 最后追踪到是nginx开启了sendfile这一项。。
-
- 具体sendfile原理可以查下,,网上写的都很详细,这里就不复述了。
-
- 一开始一直认为是nginx某个地方配置有问题。。但后来干脆自己写下,做下测试
-
- 具体代码如下(tcp那几步连接这里就不写了。网上很多):
-
-
- /**
- * @connect tcp 连接句柄
- */
- int sendClient(int connect)
- {
- int fd;
- struct stat fileStat;
- off_t offset = 0;
- fd = open("/data/web/test.com/index.html", O_RDONLY|O_NONBLOCK);
- if (fd < 0) {
- perror("open file.");
- return 0;
- }
- //获取文件信息
- fstat(fd, &fileStat);
- char buffer[fileStat.st_size];
- // read(fd, buffer, fileStat.st_size);
- //write(connect, buffer, fileStat.st_size);
- sendfile(connect, fd, &offset, fileStat.st_size);
- close(fd);
- return 1;
- }
-
- 至些我测了下,得到的还是不生效,由此可以断定,与nginx无关,与系统调度有关
-
- 至于问题,我现在的回答只能是vagrant的一个坑,具体是什么,我也无从得知,
-
- 当然, 这个我也是从表象猜测, 如果有人知道真正的原因, 还请不吝留言指教
Tags: vagrant
苹果相关 | 评论:0
| 阅读:20657


